If you would like to write user scenarios in plain-old Python using a distributed and scalable tool with a Web-based UI, this article is just for you. Low threshold makes Locust attractive for junior testing engineers, whilst many senior specialists turn to Locust, too, when they get tired of Apache JMeter.
Whether you are junior or senior, if you’ve ever wondered how to use Locust for load testing, we are sure you will enjoy this intro, as seamless as it is. After reading it, you will be able to start your load tests in Locust right away.
What is Locust
Locust is an open-source load testing tool where user behavior is described using ordinary code written in Python. This feature seriously simplifies the creation of HTTP requests and simpler and more concise scripts. Moreover, these options lower the entry threshold for junior engineers. We’ll walk you through Locust user experience, from installation to creating test scripts and complex user scenarios.
Installation
To get started with Locust, you need to install some additional software. First, Python. According to the Locust documentation, Python 3.7 or a later version is currently required.
After having done that, you are ready install Locust. To do so, type in the command line:
$ pip3 install locust
To check if installation was successful, you can request the Locust version:
$ locust -V
locust 2.13.1
To avoid using public online resources, consider deploying a local web server, for example, a JSON Server.
The installation is simple, does not require additional knowledge and should not cause any difficulties. By default the server occupies port 3000, although you can change it if you need to. The default address of the tested resource will be http://localhost:3000. To fill the JSON server, you need to create a db.json file. You can add data manually, generate it, or take it from public online sources, for example, from here.
Starting with Locust
Let’s start from the very beginning, so that we take you through the whole process of load testing with Locust from scratch. To launch Locust, use a simple command:
$ locust -f locustfile.py
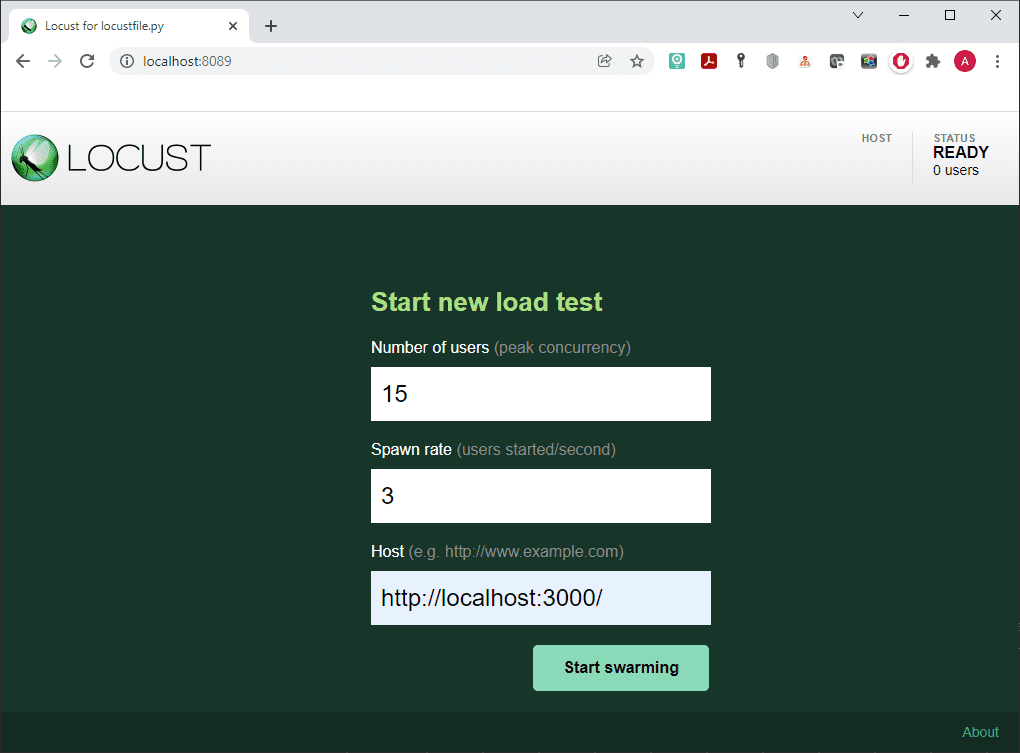
Locust has quite convenient web interface, which allows you to run scripts, track metrics in real time, and change the load during test execution. If you want to use it, open your browser and enter http://localhost:3000 in the URL field. As you remember this is the default address, so if you choose a different port number you should write in yours. You will see the start page where you can set up number of users, spawn rate and host.
Well, Locust is very usable without its web interface, too. Let’s parse an example of how it works. To do so, use the –headless flag along with the keys:
-u – the number of users being created;
-r – number of users launched per second;
-t (or –run-time)– test running time;
–stop timeout <seconds> – time to complete iterations (after the test running time expires, all tasks will be stopped immediately, but this flag gives tasks time to complete the iteration):
$ locust -f locust_files/locust_file.py –headless -u 1000 -r 100 -t 2h15m –stop-timeout 35
When running a distributed load without a web interface, you should also specify the –expect-workers = <workers_count> parameter, where workers_count is the number of worker nodes that must be connected in order for the test to begin.
How to Run a Load Test in Locust
For this test we took example right from the official documentation and adapted it to the realities of our server:
from locust import HttpUser, task, between

class QuickstartUser(HttpUser):
wait_time = between(1, 5)

@task(3)
def posts_albums(self):
self.client.get(“/posts”)
self.client.get(“/albums”)

@task(3)
def view_todos(self):
for user_id in range(10):
self.client.get(f”/todos?userId={user_id}“, name=“/todos”)
time.sleep(0.5)

def on_start(self):
self.client.post(“/login”, json={“username”:“foo”, “password”:“bar”})
As you can see, this is a regular Python module that can import data from other files and packages. Define the QuickstartUser class for modeling user behavior, which is inherited from HttpUser that gives the user a client attribute. The attribute can be used to make HTTP requests: it is basically an HTTP client that saves user sessions between requests. When running the test, Locust creates an instance of the class for each user it simulates, and starts each one in a separate thread. For a file to be a valid locustfile, it must contain at least one class inheriting from User.
The wait_time function is used to determine for how long a simulated user will wait between executing tasks. Methods marked with @task are the core of your locust file. For every running user, Locust creates a greenlet (micro-thread) that will call those methods: def posts_albums(self) and def view_todos(self).
When QuickstartUser runs, it’ll pick one of the declared tasks and execute it. Tasks are picked at random, but you can give them different weights. After completing the execution, the user will then sleep during the waiting time (in our example it is 1 to 5 seconds), after which it will select a new method marked @task and continue repeating the sequence. Note that only methods marked with @task will be picked, so you can define your own internal helper methods any way you like.
By default, Locust statistics are grouped by URL. In order not to get 10 separate entries in Locust statistics, use the parameter name=“/todos”. In addition, we have declared an on_start method. This method will be called once for each simulated user when they start.
To run the test execute the following command:
$ locust -f locustfile.py --host http://localhost:3000
The key –host http://localhost:3000 specifies the host on which Locust should be run. The corresponding field is filled in by default, but this value can be changed.

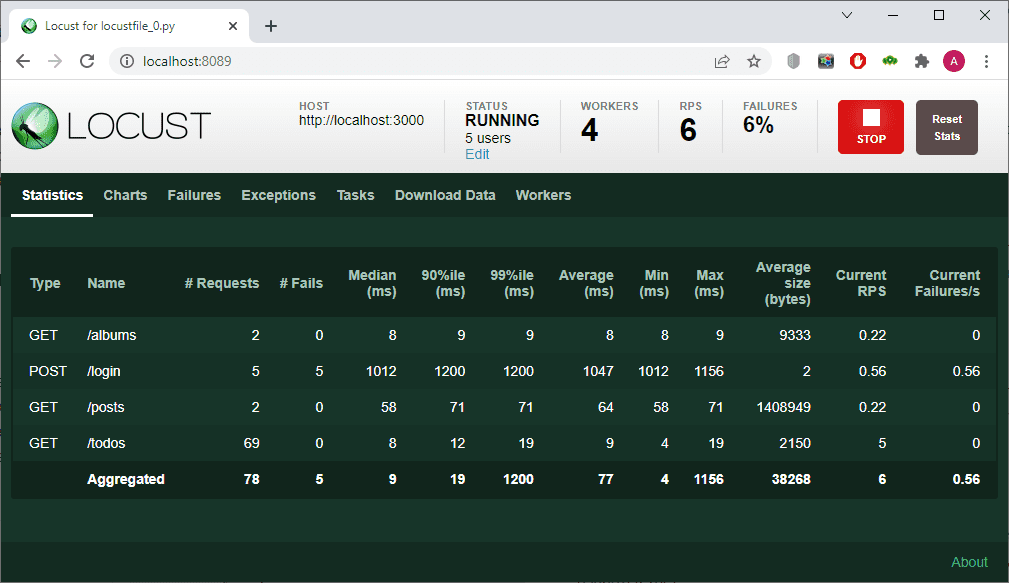
Specify the values: in our example, Number of users = 10 and Spawn rate = 2. Next, use Start swarming to run the test. And enjoy the results.
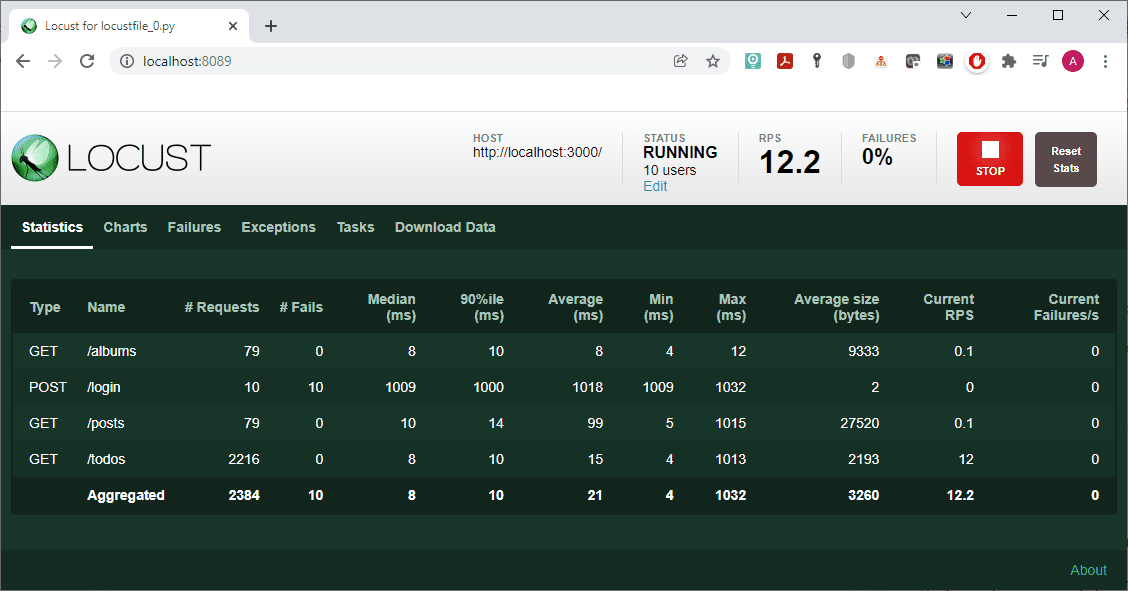
The statistics turned out to be quite expected. The number of post requests corresponds to the number of users, and they all failed since our server does not support such requests. The number of get requests for /albums and /posts is the same, and it is approximately 30 times smaller than the number of requests for /todos.
An Alternative Approach to Writing a Locust File
Locust file that performs the same actions as in the examples above can be written in a different way, that, in our opinion, gives you more options and saves time when writing your own script. Consider the following example:
import time
from locust import HttpUser

def posts_albums(self):
self.client.get(“/posts”)
self.client.get(“/albums”)

def view_todos(self):
for user_id in range(10):
self.client.get(f”/todos?userId={user_id}“, name=“/todos”)
time.sleep(0.5)

def start(slf):
slf.client.post(“/login”, json={“username”: “foo”, “password”: “bar”})

class QuickstartUser(HttpUser):
min_wait = 1000
max_wait = 5000
tasks = {posts_albums: 1, view_todos: 3}

def on_start(self):
start(self)
As you can see, there is no wait_time attribute anymore, its role is performed by the min_wait and max_wait attributes, which set the minimum and maximum waiting time in milliseconds. This attribute can also be set in several other ways:
Another way of defining user tasks is also used here, without using the @task marker. These tasks are defined using the tasks attribute set as a list {posts_albums: 1, view_todos: 3}, which determines that view_todos will be executed 3 times more often than posts_albums. In general, both examples can be considered equally effective. Also, you can set this attribute using the TaskSet class.
Meanwhile, it is important to highlight the fact that you do not have to process the server responses – Locust does it for you. Let’s see, how exactly it happens.
Processing Server Responses in Locust
The server response status, even if it is 200 or 201, does not guarantee that the required data will be received. In Locust, the user can independently determine the success of the server response. Consider the following example:
from random import randint

import requests
from locust import HttpUser, constant

def get_todos(self):
todos_id = randint(100, 209)
rang = todos_id // 10
stringName = f’todos_id in [{rang}0-{rang}9]’
with self.client.get(f’/todos/{todos_id}‘, catch_response=True,
name=stringName) as response:
if response.status_code == 200:
completed_status = response.json().get(‘completed’)
if completed_status == True:
response.success()
else:
response.failure(‘Completed status todo is not a True’)
else:
response.failure(f’Error todos_id! Status code =
{response.status_code}’)

class QuickstartUser(HttpUser):
tasks = [get_todos]
wait_time = constant(0.1)
The request implemented in this example is supposed to get todos objects from the server with the value of the id parameter in the range from 100 to 209. In our database, the maximum id value for this type of object is 200, so all requests with an id greater than 200 will return a 404 status code. After receiving a response from the server, we check it, and if it is not equal to 200, we exit with an error and report it: response.failure(f’Error todos_id! Status code = {response.status_code}’). If status_code == 200, we check the ‘completed’ parameter for the current object, and if it is True, we exit with a response.success(). Otherwise, we exit with the corresponding error message: response.failure(‘Completed status todo is not a True’).
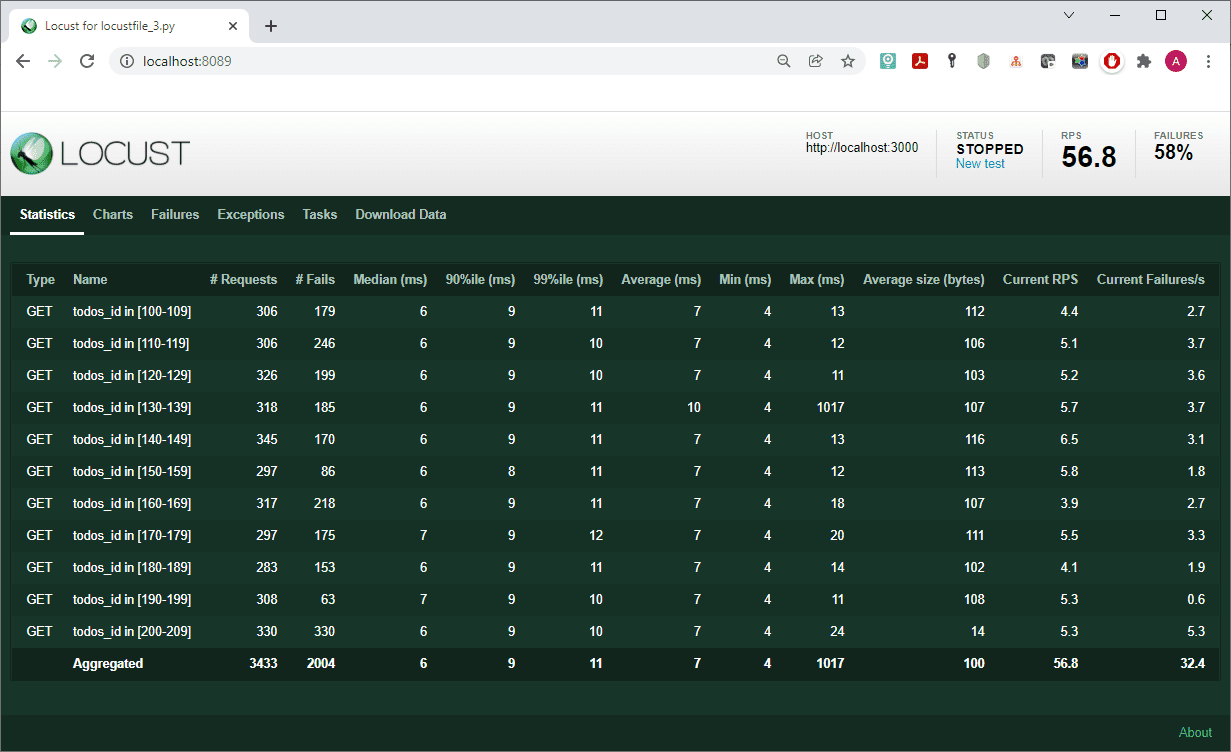
The results of the script are as follows:
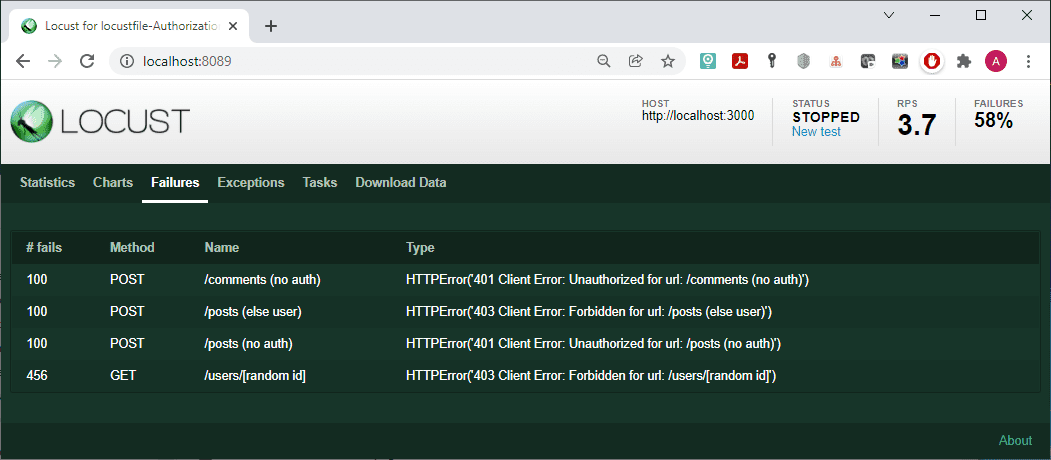
The list of failures is also interesting:

For our own convenience, the output was grouped into several lines, depending on which range the value of the id parameter of each received todos object fell into. This was done by setting the get request parameter: name= f’todos_id in [{rang}0-{rang}9]’, where rang = todos_id // 10.
Finally, having tried some basic tests, let us give you one more piece of advice on how to build complex user scenarios in Locust.
How to Build Complex User Scenarios in Locust
When performing load testing tasks, an important requirement is to build the most realistic user scenarios. To do so, deploy another local Web server – JSON Server Auth. This server provides an opportunity to authorize users and differentiate their access rights from those of unauthorized ones.
Install both servers, JSON Server and JSON Server Auth with the following command:
$ npm install -D json-server json-server-auth
Start the JSON Server using JSON Server Auth as middleware:
$ json-server db.json -m ./node_modules/json-server-auth
To register a user on this server, use Post requests /register, /signup >or /users. In the request body, specify email (as the user name) and password. You can also add any other fields. The password will be encrypted using bcryptjs{“accessToken”: “xxx.xxx.xxx”} and status code 201.
For authorization, you use Post requests /login and /signin. To then send an authorized request, specify the request headers, including {‘Authorization’: ‘Bearer xxx.xxx’xxx’}. Consider an example with user authorization:
from locust import HttpUser, between, task

class QuickstartUser(HttpUser):

wait_time = between(1, 2)
SessionToken = “”

def on_start(self):
post_response = self.client.post(“/login”, {“email”: “NewUser@mail.com”,
“password”: “NewUsersPassword”})
self.SessionToken = str(post_response.json().get(‘accessToken’))

@task
def user_info_auth(self):
self.client.get(‘/users’, name=‘/users (auth)’,
headers={‘Authorization’: ‘Bearer ‘ + self.SessionToken})

@task
def user_info_no_auth(self):
self.client.get(‘/users’, name=‘/users (no auth)’)

@task
def about(self):
self.client.get(‘/comments’)
In the on_start method, user authorization is performed. We send a request and process the received response: we save the received value of ‘accessToken’ to the SessionToken variable declared at the user class level. After that, use this value for authorization in the user_info_auth method by adding a new header to the get request: headers={‘Authorization’: ‘Bearer’ + self.SessionToken}.
In the user class, we have defined only 3 methods that are equally likely to be executed – an authorized get request ‘/users’, the same unauthorized request, and an unauthorized get request ‘/comments’.
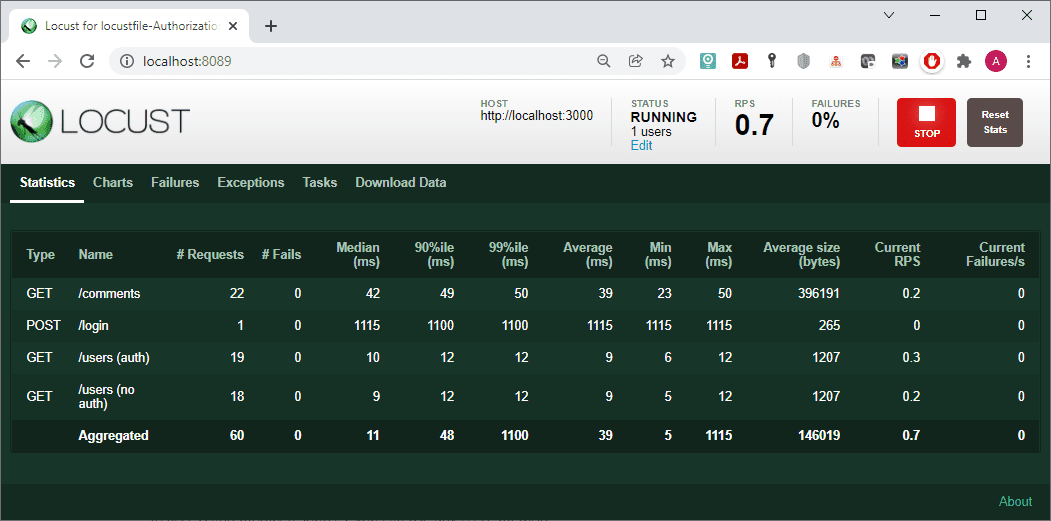
However, as you can see from the statistics, there is no difference in the work of authorized and unauthorized requests (Fails = 0). For a more realistic load, differentiate the authorized and unauthorized zones. To do so, create the following routes.json file:
{
“/users*”: “/600/users$1”,
“/posts*”: “/644/posts$1”,
“/comments*”: “/664/comments$1”,
“/todos*”: “/640/todos$1”
}
And then restart your Web server with the following line:
$ json-server db.json -m ./node_modules/json-server-auth -r route.json
As a result of this configuration, we have restricted access rights to some resources of our Web server in accordance with the table:
Meanwhile, you can make the user scenario a little more complicated:
from random import randint

from locust import HttpUser, task, TaskSet, constant

class MyException(Exception):
pass

class UserActivity(TaskSet):
SessionToken = “”

def on_start(self):
post_response = self.client.post(“/login”, {“email”: “NewUser@mail.com”,
“password”: “NewUsersPassword”})
self.SessionToken = str(post_response.json().get(‘accessToken’))

@task(10)
def user_info_rand(self):
self.client.get(f’/users/{randint(1, 11)}‘,
headers={‘Authorization’: ‘Bearer ‘ + self.SessionToken},
name=‘/users/[random id]’)

@task(3)
def get_posts_auth(self):
self.client.get(‘/posts?userId=11’,
headers={‘Authorization’: ‘Bearer ‘ + self.SessionToken},
name=‘/posts?userId=11 (auth)’)

@task(1)
def get_posts(self):
self.client.get(‘/posts?userId=11’, name=‘/posts?userId=11 (no auth)’)

@task(2)
def custom_script(self):
new_else_post = {‘userId’: 10, ‘title’: ‘new not generated post’,
‘body’: ‘new generated post’}
self.client.post(‘/posts’, json=new_else_post, name=‘/posts (else user)’
headers={‘Authorization’: ‘Bearer ‘ + self.SessionToken})
new_post = {‘userId’: 11, ‘title’: ‘new generated post’,
‘body’: ‘new generated post’}
self.client.post(‘/posts’, json=new_post, name=‘/posts (no auth)’)
post_response = self.client.post(‘/posts’, json=new_post,
name=‘/posts (auth)’,
headers={‘Authorization’: ‘Bearer ‘ + self.SessionToken})
if post_response.status_code != 201:
raise MyException(f’Error add new post {post_response.status_code}‘)

new_post_id = post_response.json().get(‘id’)
new_comment = {“postId”: new_post_id, “name”: “my new comment”,
“email”: “NewUser@mail.com”,
“body”: “the body of new comment”}
self.client.post(‘/comments’, json=new_comment, name=‘/comments (no auth)’)
comment_response = self.client.post(‘/comments’, json=new_comment,
name=‘/comments (auth)’,
headers={‘Authorization’: ‘Bearer ‘ + self.SessionToken})
if comment_response.status_code != 201:
raise MyException(f’No new com. added: {comment_response.status_code}‘)

new_comment_id = comment_response.json().get(‘id’)
comment_response = self.client.get(f’/comments/{new_comment_id}‘,
name=‘/comments/[new post id]’,
headers={‘Authorization’: ‘Bearer ‘ + self.SessionToken})
if comment_response.status_code != 200:
raise MyException(f’New com. not read: {comment_response.status_code}‘)

class QuickstartUser(HttpUser):
tasks = [UserActivity]
wait_time = constant(0.3)
Our user class is still called QuickstartUser. A TaskSet class with the name UserActivity is passed to the tasks attribute – this is another option for specifying tasks to be performed in tasks. The on_start method here is the same as in the previous example. We are logged in under the user name with the parameter ‘id’ = 11.
In the user_info_rand method, each time we request information about one of the users with a randomly selected value of ‘id’ from 1 to 11. The request is authorized, so all requests in which the value of ‘id’ is not equal to 11 will return an error.
Then there are two methods, get_posts_auth and get_posts, which request all user posts with ‘id’ = 11: the first of them is authorized, and the second is not. Because the access code to this resource is set as 644, both methods should work in the same way.
The next method, custom_script, is a separate user scenario.
In its first part, we make three attempts to create a new post. For the first attempt, an authorized user with ‘id’ = 11 tries to create a new post belonging to a user with ‘id’ = 10. The second post tries to create an unauthorized user. In the third one, an authorized user with ‘id’ = 11 tries to create a post on its own behalf (with ‘userId’ = 11). The first two attempts should return an error. In case the third request also fails, check the status code, and if it is not equal to 201, throw in an exception using the MyException class we created.
Otherwise, if the post was successfully created, make two attempts to create a new comment for this post (by its parameter ‘id’ = 10). The first attempt uses an unauthorized request and should therefore return an error, whilst the second uses an authorized one. As in the previous case, an unauthorized request should fail. If the response code to the authorized request is erroneous, we also throw in MyException.
In the final part of the method, try to read the newly created comment, in case it was successfully created. As in the previous cases, we do this with the help of unauthorized and authorized requests. Our access rights are configured in the way for everyone to be able to read the comments. Therefore, both of these requests should work the same way. And again, if the response code to the authorized request is erroneous, we also throw MyException.
The results of the script do not contain anything unexpected:
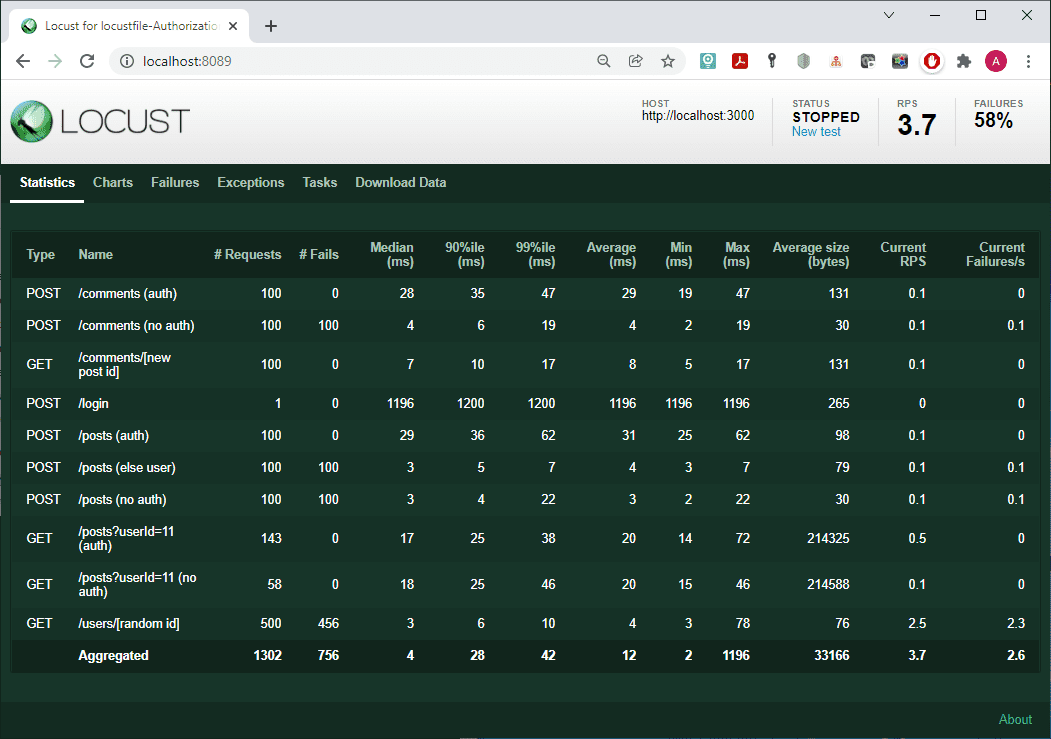
All unauthorized requests returned an error.
Let’s now see how to distribute the load.
How to Distribute Load with Locust
With the help of Locust, the load can be distributed. In such a situation, when starting Locust, you should specify the appropriate role:
–master – the machine will manage the test and collect statistics. There can be only one master.
–worker – the actual load sources.
Let’s run a Web server and several Locust sessions in different consoles as follows:
$ json-server –watch server_models/db.json
$ locust -f locust/locustfile_0.py –master –host http://localhost:3000
$ locust -f locust/locustfile_0.py –worker
$ locust -f locust/locustfile_0.py –worker
$ locust -f locust/locustfile_1.py –worker
$ locust -f locust/locustfile_1.py –worker –host http://localhost:3000
When you open Locust, you can see that the number of machines that will supply the load is displayed in the upper panel:
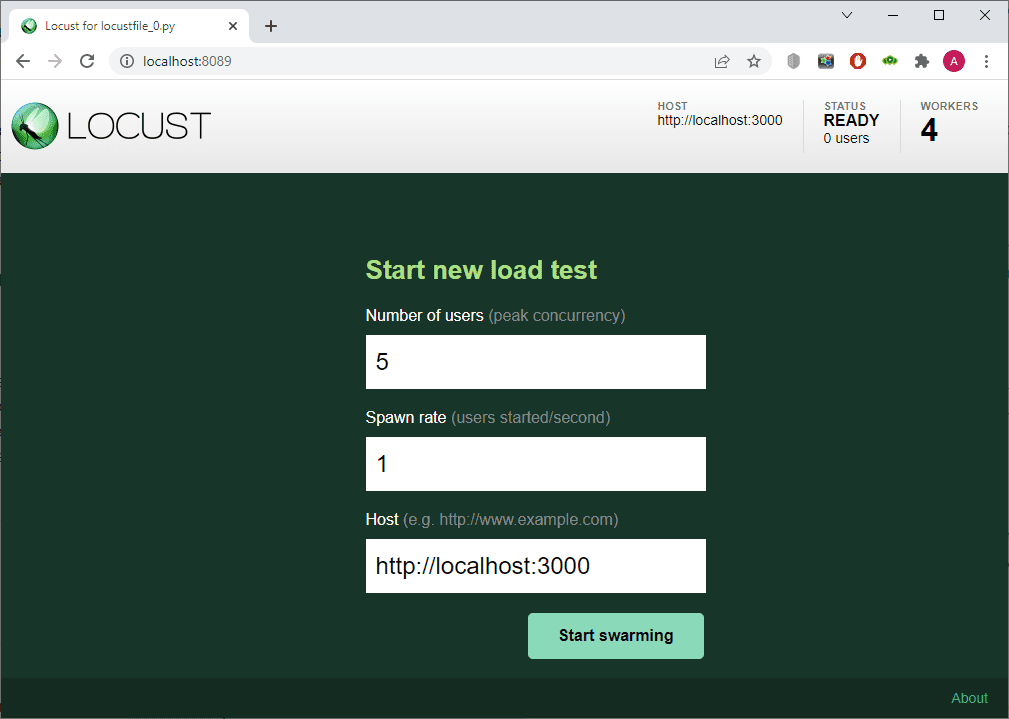
You can also see their number during the test execution:
Conclusions
Locust is a powerful tool for load testing. It provides ample opportunities for creating queries and processing the responses received, has a clear and user-friendly interface and a low entry threshold for novice specialists. With Locust, you get a familiar python framework that lets you define the behavior of your users using Python code. Locust is also very flexible: even though it was primarily designed to work with web sites/services, it can be used to test almost any system or protocol. Just write a client for what you want to test: there is nothing to stop you!
If, however, you have something more interesting or urgent to do, never do tomorrow what you can let us do today: in PFLB, 100+ engineers on staff have completed 300+ major projects, rest assured they can help with yours, too. Request a demo!
Table of contents
Let us know about your needs
We can provide multiple performance testing services and a lot more than that if the situation needs a far more complex approach.
Get a quote You’ll hear back from our tech account manager in one day if not sooner
Related insights in blog articles
Explore what we’ve learned from these experiences
11 min read
Roles and Responsibilities of Performance Tester

Apr 9, 2024
The core of efficient performance testing is an experienced, certified and well-structured team of professionals, who have already worked in similar projects, and learned all the peculiarities of QA testing types, and protocols. If consciously chosen, they can evaluate a product, test its behavior under a load, check its response time, etc., and thus, empower […]
11 min read
Tips for Efficient Web Application Performance Testing

Apr 4, 2024
Performance testing is one of the most challenging components of web application testing. But it is worth it: if done right, performance testing can forecast product behavior and its response to user’s actions with an impressive amount of detail and precision. Irrelevant web performance test data or wrong metrics chosen during testing cost companies a lot of money and effort, while not monitoring your web application performance at all can lead directly to a crash, say, on Black Friday, if you are not prepared to handle an increased number of concurrent users. Business or product owners needn’t know exactly how to performance test a website, but it’s useful to have a basic understanding of procedures that you pay for. From this post, you can learn what web application performance testing is, when it should be done, and how. Then, you will be able to make an informed choice whether to hire testing specialists or run testing sessions on your own.
15 min read
Top Tools for Developers in 2024

Apr 2, 2024
The ratings of the best software development tools are time-sensitive: new tools emerge every now and then. Monitoring and mastering them is a full-time job, and sometimes a waste of time, too, since some oldies but goldies remain chosen by the team. Having done all the hard choices for you, we are sharing our list […]
4 min read
Big Data Europe 2024

Mar 22, 2024
Big Data Conference Europe is a four-day conference with technical talks in the fields of AI, Cloud and Data. The conference will take place both on-site and online, providing the opportunity for everyone to participate in their preferred format.
Be first to know
Once a month we’ll be sending you a letter with all the useful insights that we could find and analise
People love to read
Explore the most popular articles we’ve written so far
- Android vs iOS App Performance Testing: What’s the Difference? Dec 9, 2022
- How to Save Money on Performance Testing? Dec 5, 2022
- Performance Testing: What It Is, and Why You Need It Oct 7, 2021
- Cloud-based Application Testing: Features & Types Apr 15, 2020